Showing posts with label Imagine. Show all posts

Friday, January 28, 2011

Tags, Bags, Boxes and More Meets Audrey!

Today I want to share with you my design project for Creative Critterz Imaginations blog.

Tags, Bags, Boxes and More (TBBM) is one of my all-time favorite Cricut cartridges and Audrey is my favorite Imagine paper cartridge, so I just had to use them together.

I made this cute Valentine purse for my friend who loves pink and black. Did I mention she also loves chocolate?


I used the TBBM cartridge to make the purse and sized it using the fit- to-page function on the Imagine. The purse is flood filled with paper from the Audrey cartridge. I then added acetate behind the window, ribbon and rhinestones.

My favorite part, next to using my Imagine and eating some of the chocolate was making the rosette. If you missed my video last Wednesday on how to make rosettes, click here.

Recipe:
Audrey Imagine cartridge
TBBM Cricut cartridge
Acetate to cover window
Kaiser Rhinestones
Ribbon, buttons, and sticker from my stash
Homemade rosette (see video above)

Thanks for visiting and have a great week.

Posted by Picasa

Friday, December 31, 2010

Making Transparencies (Overlays) with the Imagine

Today I want to share with you my design project for Creative Critterz Imaginations blog.

I so love my Imagine and I couldn’t wait to show you this new technique. In today’s video, we will be using the Imagine to print on transparencies to create our own overlays. The overlays turn out perfect and look like you purchased them. Complete instructions are on the video.


The card base is cut at 3 ¾ inches by 5.25 inches. I used the rectangle from the George cartridge and cut it at 5.3 inches and flood filled using the Audrey cartridge…my new favorite! Trim the overlay to 3 ¾ x 4 ¼ inches and attach using vellum glue dots. Add rhinestones and a rub-on and the card is done! My kind of card.

Recipe:
George Cricut Cartridge
Audrey Imagine cartridge
Kaiser Rhinestones
Ink Jet transparencies
Vellum Glue dots
Lavender card stock

For more videos, please visit my blog or my YouTube Channel.
Happy New Year!

Posted by Picasa


Friday, December 24, 2010

Jewelry Box and Card

If you are looking for a last minute jewelry box, here it is. I made this quick and easy box using the Wrap It Up Cartridge and my Imagine. The snowflake box is on page 68 of the Wrap It Up manual and I used the fit-to-page option. It is flood filled with digital paper from the Imagine More cartridge. I added glitter and a ribbon and was done. I just had to make a quick gift card to go with the mini jewelry box.


Hope you are having a wonderful holiday. I have the best followers and I am extremely grateful to each and every one of you for your support! I am so looking forward to 2011 and have more fun projects and videos planned.

Happy Holidays!

Linda

Posted by Picasa

Friday, December 17, 2010

Christmas Tag

Today I want to share with you my design project for Creative Critterz Imaginations blog.

Can you believe it? Only one week until Christmas Eve. I am busy wrapping gifts and making a few last minute tags like the one below. I am so thankful that my Imagine makes the task easy! I also used a fun new product called Wobbles that add movement to my card! I so wish you could see it move!


First I cut a 2.8 inch circle using the stock circle shape and flood filled it with digital paper from Snow Angels. I then cut a stock scalloped shape at 3.2 inches and flood filled using the same cartridge. The stamp is from my stash and I colored it using watercolor pencils and a fun technique that I posted on my blog a couple of weeks ago. Just in case you missed it, I thought it might be helpful to post it again. This technique makes your regular and water colored pencils look like expensive markers.


Recipe:
Snow Angels Imagine cartridge
Rubber stamp from Great Impressions
Signo uni-ball pen for white dots
Ribbons from my stash, dimensionals, glitter glue, and adhesive

Thanks for visiting and Happy Holidays!


Posted by Picasa

Friday, December 10, 2010

Gift Cards

Today I want to share with you my design project for Creative Critterz Imaginations blog. I made this cute gift card using the new Holly Jolly cartridge.


The gift card is on page 7 of the Cindy Loo manual and is cut at 6 ½ inches. I love that this card has slits in it that fit most gift cards. I used my Argyle Cuttlebug folder for added texture. Next, I used my Imagine to make the background. The background cut is on page 7 of the Nursery Tails Art Cartridge. This image was cut at 4 inches and I only cut the first layer using purchased Christmas paper.

The letter carrier is cut at 3 ¾ inches and is from the Holly Jolly Cartridge. I used a stamp for the Ho Ho, added glitter glue, and a metal rhinestone to the spokes. I also used my Swiss Dot Cuttlebug folder to add texture to his hat and top. Lastly, I added more rhinestones and tied a quick knot.

Recipe:
Cindy Loo Cricut cartridge
Nursery Tails Imagine cartridge
Bazzill cardstock
Christmas cardstock from DCWV Christmas Combo
Swiss Dots and Argyle Cuttlebug folders
Delta Ho Ho Ho rubber stamp
Ribbons from my stash, dimensionals, glitter glue, Kaiser rhinestones and adhesive


I know this is not a Christmas gift card, but I made this for a friend and I just had to share.

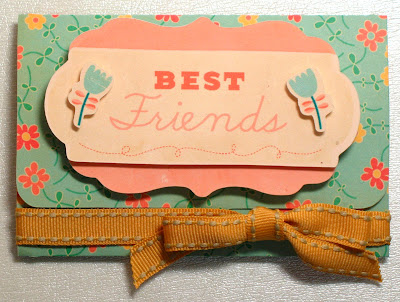
The gift card is on page 46 of the Wild Card manual and is cut at 4.2 inches. I used the Best Friends Imagine cartridge paper on page 35 to flood fill the image and then printed using beige paper. Best Friends image is on page 13 of the manual and is cut at 2 inches. I used dimensionals to attach the layers.

Recipe:
Wild Card Cricut cartridge
Best Friends Imagine cartridge
Bazzill Card stock, beige
Ribbon from my stash, dimensionals, and adhesive

Thanks for visiting!

Posted by Picasa

Friday, December 3, 2010

Fun with Winter Punnies!

Today I want to share with you my design project for Creative Critterz Imaginations blog. I love My Pink Stamper’s Winter Punnies! They are so fun and are a natural addition to my Cricut Imagine projects. Robyn’s stamps are extremely well made and so easy to use. In fact, they were so easy to use I just had to make two cards to share with you!


This is another one of my quick and easy cards. The base card measures 5 inches x 7 ¾ inches. The inside liner was cut at 4 ¾ x 7 ½ inches using my favorite digital paper from the Snow Angels cartridge. I cut two 4 inch icons on page 30 of the Snow Angel manual and hand trimmed the outer layer. I used dimensional s to attach the outside layer.

Next, I cut a turquoise strip of paper 2 x 4 ¾ inches and used my Martha Stewart’s Double Loops Punch Around the Page on both sides. Thanks to My Pink Stamper, I had the perfect sentiment, plus two cute snowflakes. Lastly, I added a bow.

Recipe:
My Pink Stamper Winter Punnies
StazOn Black Ink (any ink will work).
Snow Angel
Bazzill Card stock
Ribbons from my stash, dimensionals, mini glue dots, and adhesive
Martha Stewart’s Double Loops Punch Around the Page


I saw a similar card in the November/December issue of PaperCrafts magazine and had to make it using the Imagine. Super cute and easy!

First, I flood filled nine 1 ½ inch squares using paper from the Snow Angel cartridge. The Imagine makes matching papers easy! The outside card measures 5 inches x 5 inches and the inside liner measures 4 ¾ x 4 ¾ inches. Be sure to round the corners. I tied the ribbon around the liner before attaching it to the base card.

For the sentiment, I cut a paper strip measuring ¾ x 2 ¾ inches and notched the edge. I measured ¾ of an inch and 7/8 from the left side and scored on both lines. Before folding, I stamped the sentiment. Lastly, I attached a button tied with embroidery floss.

Recipe:
My Pink Stamper Winter Punnies
StazOn Black Ink…any ink will work
Snow Angel
Bazzill Card stock
Ribbons from my stash, dimensionals, mini glue dots, adhesive, corner rounder
Button and embroidery thread from my stash

PS In case you are wondering why there is no Fab Five Friday post, I thought it would be fun to move things around on my blog and add an extra card or project post on Fridays and move my Fab Five Friday post to Thursdays and be renamed Terrifically Talented Thursday in honor of all the talented bloggers and sites that are featured! Here is a link to the first Terrifically Talented Thursday post.Thanks for visiting!

Posted by Picasa

Monday, November 29, 2010

Christmas Boxes And Tags

Today I want to share with you my design project for Creative Critterz Imaginations blog.I know that many of you are going to be wrapping presents this week so I thought it would be fun to make quick and easy gift tags and an adorable box. The Imagine makes it super simple!


This tag is on page 5 of the Snow Angel Art Cartridge and cut at 6 inches. 3-D foam squares were used for dimension and a bow was added. I also added a string of pearls with mini glue dots. Super easy!


The ornament is on page 4 of the Snow Angel Art Cartridge and is cut at 7.9 inches. Note that only three layers of this cut were used. Next, I cut a scalloped circle from the shapes library at 4 inches and flood filled. 3-D foam squares were used for dimension. Lastly, I used Stickles and added a bow.


The box is on page 80 of the Wild Card cartridge and cut at fit-to-page. The snowflake is on page 24 of the Snow Angel Art Cartridge and cut at 3 inches. I cut the composite snowflake and the last three layers. I did not cut the green layer. 3-D foam squares were used for dimension. The box is flood filled using the Snow Angel cartridge. Lastly, I cut a 4 x4 inch acetate square and taped it to the top of the box. The inside liner is 4 ¼ x4 ¼ inches.


This box is made the same as the first box, except I used purchased pattern paper for the box.

Recipe:
Snow Angel
Wild Card (boxes)
Acetate (boxes)
Card stock (liners and to make second box)
Assorted ribbons from my stash, dimensionals, Star Dust Stickles, pearls and mini glue dots.

Happy Holidays!

Wednesday, November 24, 2010

How to Make Double Sided Paper Using the Imagine

Today I want to share with you my design project for Creative Critterz Imaginations blog. In the video, I use regular white cardstock, colored card stock, and cardstock that is white on one side and colored on the other to make double sided papers.


For the above card, I used card stock that is white on one side and green on the other. Detailed directions for making this card are on the video. I also made a matching envelope.

Recipe:
Imagine More Art Cartridge
Wild Card Cartridge
SEI Paper….green on one side and white on the back.
Buttons
Ribbon
Twine
Adhesive
Rub-on


Last month, I made this quick and easy card using double sided paper and just had to try it with the Imagine. It worked!

Recipe:
Imagine More Art Cartridge
Wild Card Cartridge
Bazzill paper
Kaiser Rhinestone
Ribbon
Adhesive

Thanks for visiting and have a Happy Thanksgiving!

Posted by Picasa

Monday, November 22, 2010

Oh Baby!

I made this gift card holder for a friend’s baby shower and just had to share.


The gift card is on page 7 of the Cindy Loo manual and is cut at 6 ½ inches. I love that this card has slits in it that fit most gift cards and is super simple to make. Next, I used my Imagine to make double sided paper and cut the image on page 7 of the Nursery Tails Art Cartridge. This image was cut at 4 inches and I only used four of the layers.

Lastly, I used 3-D foam squares from Scrapbook Adhesives for added dimension. If you do not have an Imagine, you could use any Cricut cut to decorate the front of this quick and easy gift card. The ribbon is from The Memory Trail, my favorite local scrapbook store.

Thanks for visiting and have a great Thanksgiving Week!

Monday, November 15, 2010

Tick Tock

Today I want to share with you my design project for Creative Critterz Imaginations blog.

One of the reasons that I purchased my Imagine is that I have a limited amount of time to craft, yet I want to make quick and easy cards that look like I spent a lot of time and effort on them. The Imagine allows me do this and has simplified my life! This card literally took 15 minutes to make and it was such a hit at the birthday party. Our friend was turning 40 so I just couldn’t pass up the opportunity to make a funny card. I find making cards for men challenging, but not with the Imagine More Cartridge.


Recipe:
Imagine More art cartridge
Kirkland’s professional glossy inkjet photo paper
3-D Foam Squares
Adhesive

Instructions:
The clock is on page 32 of the Imagine More manual and is cut at 5 inches. Cut two and then manually cut out the words Tick and Tock from one of the clocks. Weld two 4.8 inch circles using the George Cartridge. Next cut a 4.25 inch circle for the inside of the card and use Microsoft Word or another type of word processing program to print the sentiment. Use pop dots to give the words Tick and Tock added dimension. If you use thick glossy photo paper, be sure to increase the pressure to five and change the paper setting to glossy. Also remember to set the blade at 6.

Thanks for visiting and please stay tuned for my first Gypsy video. Hint: It involves Christmas.

Posted by Picasa

Wednesday, November 10, 2010

Cute Kitty Card Using Photographic Matte Paper

A special thanks to all of you for your encouragement and support. I have received so many comments and emails congratulating me on being selected for the Creative Critterz Imaginations Design Team.

Today I want to share with you my initial post, in case you missed it, along with a big thanks for all your kind words! I am truly blessed to have such wonderful viewers.

For this project I used the Cindy Loo Cricut cartridge and the Nursery Tails Imagine cartridge. Kitty is cut at 5.5 inches and I used all the layers including the shadow feature. The fun thing about this card is that you can make it with your Cricut. The only difference will be in your choice of papers.

The Imagine makes it so easy to quickly match prints and solid digital papers. One of my favorite things about the Imagine is that you can change the look of your cards by simply using different type of papers.

In the video below, I include examples of cards made with regular white card stock, photo glossy paper and photo matte paper. I also demonstrate how to make the Kitty card and how to use photographic matte paper in the Imagine.


Thanks for visiting and have a great day!


Posted by Picasa

Thursday, November 4, 2010

Creative Critterz Imaginations Design Team

I am so excited! As you know from Monday’s post, I was chosen to be part of the Creative Critterz Imaginations Design Team. Tammy Skinner and the team are amazing and they have exciting things planned for the new Imagine blog. Today is my day to be introduced so I would be honored if you stopped over for a visit. I have a cute card and video to share with all of you. Thanks again for all your nice comments and words of encouragement. They are so important to me!

Linda

Monday, October 18, 2010

Hoppy Birthday Card

I know I am beginning to sound like a broken record, but I do love my Imagine. I used the Nursery Tails cartridge and photo glossy paper to make a Hoppy Birthday Card. If you use thick glossy photo paper (I used Kirkland’s professional glossy inkjet photo paper from Costco) be sure to increase the pressure to five and change the paper setting to glossy. Also remember to set the blade at 6.


The outside scalloped circle is on page 37 of the Storybook cartridge and cut at 5.5 inches. Next, I glued the outside circle to a welded card made using Design Studio. All the paper is from the Nursery Tails cartridge. The smaller scalloped circle is from the Forever Young cartridge on page 72 and cut at 4.1 inches.
For the image, I used the circle layer from the Nursery Tail’s baby shower announcement on page 18. The image is cut at 3.6 inches using the true size function. The frog layer is cut at 1.7 inches also using the true size function. I added rhinestones and pop dotted the frog. Too cute!


Posted by Picasa

Friday, October 1, 2010

Cut Anywhere on a Page Using the Imagine

Thanks all for the wonderful feedback on my video explaining how to print anywhere on a page or card. I love hearing from you! Now let’s take it a step further and use this workaround to cut virtually anywhere on a page.

Step one scroll down and watch the video.

Then use the white squares technique to move the cutting blade to the location you want. In other words, determine where you want your cut to begin and fill the mat with white squares just like on the video. Select print only and print. Notice nothing printed. Next, click on load last and then click on the back button. Delete all the white squares using the backspace key. Add your image and click on next. Change your settings to print and cut, or just cut and select apply. Click on next and you are ready to cut. Click go to cut and you are done!


Stayed tuned for Fab Five Friday. This is going to be a two post day!

Tuesday, September 28, 2010

My Imagine and Lessons Learned

My Imagine was delivered late Thursday and it has been a rollercoaster ride. I put on my big girl Cricut panties and unloaded the box, albeit with some major anxiety. My dear husband (DH) arrived home and started to help with the calibration process. We calibrated it three times with no luck, but thanks to patience on the part of my DH ( by the way I have none) and this amazing blog post and video by More Than Favors we got the job done. Please take a minute to read this post on advanced calibration. It will save you some tears, I promise.

I thought I would share some of the lessons I learned the hard way!

Double check when you are using the load last feature with anything but a 12 inch by 12 inch paper setting. I did not double check the screen and now I have a permanent inked flower on my new cutting mat. Yikes.

Make sure that your cartridges are firmly in place. I couldn’t figure out why mine were not being recognized. Duh!

If you use thick glossy photo paper ( I used Kirkland’s professional glossy inkjet photo paper from Costco) be sure to increase the pressure to five and change the setting to glossy. Also remember to set the blade at 6. Also the drying process takes a little longer with glossy paper, so be patient. I wasn’t and thought there was something wrong with my machine so I tried to remove the paper. Bad move… I had to shut off my machine and start over.

I am still learning, but have grown to love my new Imagine. It is truly an amazing machine and the print quality is outstanding. Also it cuts better than my v1 or my expression. I know since I repeatedly tested the machines using the same paper and same cut. I am also thrilled that I figured out how to print a sentiment anywhere on a card or page.Check out this video if you want to learn.

Posted below are my first two cards.

For this card, I printed the layers compressed and then added a couple of clouds and pop dotted the bird. I like that I can choose to add only a couple of layers and still get a nice look.


For the inside, I used the square shape and flood filled with a paper from Just Friends. I made this card before I discovered how to print the sentiments anywhere on a card.


This card is printed using Nursery Tails and glossy photo paper. I printed the layers compressed and added a couple of butterflies. For the inside I reduced the size of the outside layer and flood filled the rectangle. I used the Wild Card cart for the sentiment, flood filled and cut. The coordinated digital paper makes life super easy. I wanted to weld the card together with my DS but instead I created a small card and glued it to the outside cut. It doesn’t look as professional as a welded card, but it works at least until the Gypsy software is updated.


Posted by Picasa

Monday, September 27, 2010

How to print a Sentiment Anywhere on a Card or a Page Using the Imagine

My Imagine was delivered late Thursday and I love it! I wanted to use it to print a sentiment anywhere on my card or page so I came up with this workaround. The process is a little challenging, but I am hopeful future updates to the Gypsy will make this easier. In the meantime, I will be saving money on rubber stamps and avoiding cutting intricate sentiments. Now, I can print sentiments from my favorite cartridges anywhere on my card or page.

I will post a couple of projects tomorrow along with lessons learned so you can avoid learning the hard way. Enjoy the video.

Total Pageviews

 
--------- ----------